


Since there is such a detailed tutorial, I will make it, I believe I can!
Father's Day is just around the corner, and what better way to show your love and appreciation than by crafting a unique, handmade gift? In this blog, we’ll walk you through the steps to create a beautiful wooden Kinetic medal using a laser cutter. This gift is not only distinctive but also easy to make, requiring just a few materials and some creativity.
① Laser cutter (e.g., Atomstack A20 20W)
② LightBurn software
③ Father’s Day Kinetic medal laser cutting file
④ 3mm wood
⑤ Glue
You can find a wide variety of laser cutting files and high-quality laser cutting and engraving materials at Creatorally. Whether you need design files or crafting supplies, Creatorally provides a one-stop shopping experience to help you easily complete your DIY projects.
Step1: Import the Laser Cutting File and Cut the Pieces
1.Import the Design File: Open LightBurn software and import your Kinetic medal laser cutting file.
2.Adjust Settings: Set the cutting and engraving parameters based on the reference data. Test on a scrap piece of wood to make sure the settings are correct.
3.Secure the Wood: Place the 3mm wood board on the laser cutter working area, making sure it is flat and secure.
4.Start Cutting and Engraving: Begin the cutting process and monitor the machine to ensure it is working safely. Once the cutting is complete, carefully remove the pieces.

Step 2: Assemble the Medal
5.Secure the Bottom Layer: Use the slot to fix the bottom layer together.


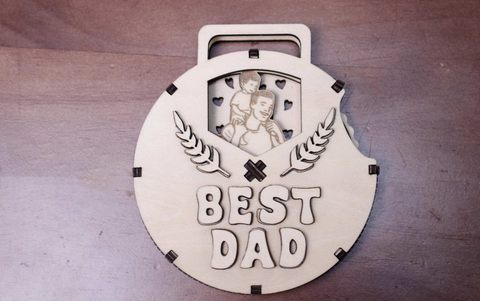
6.Attach the Second Layer: Place the second layer on top of the bottom layer. The second layer has engravings of special moments with your father, which will show as it rotates. Then, attach another slot.


7.Attach the Outer Interlocking Segments: Following the design plan, fix the outer interlocking segments around the medal, leaving a space for the gear to move.


8.Secure the Top Layer: Place the top layer on and align each notch, pressing down firmly to ensure it stays in place.


9.Attach the "Best Dad" Lettering: Glue the "Best Dad" decorative letters onto the top layer.


Crafting a Kinetic medal for Father's Day using a laser cutter is a thoughtful and unique way to show your appreciation. This handmade gift not only demonstrates your love and creativity but also results in a beautiful keepsake that your dad will cherish. Follow these simple steps, and you'll have a special gift ready in no time.
If you enjoyed this tutorial, feel free to share it with friends and family, and stay tuned for more exciting DIY projects and tips on our blog.
Since there is such a detailed tutorial, I will make it, I believe I can!

1 comment